Five Animal Kenpo: Dragon, Snake, Tiger, Leopard, Crane.
  • Home
  • Black Belt Roster
  • Resources
  • Photo Album
  • Video Album
  • Instructional Videos
  • Contact Us

10. Cracking the Cage (right flank left grab on shoulder).

4/2/2012

1 Comment

 
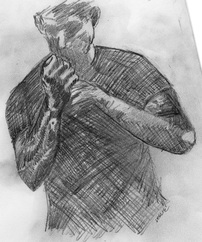
A left grab from the right flank to your right shoulder does not by itself pose an immediate threat.  This technique is really designed to capitalize on this preliminary grab position to cancel an impending right punch. 

My left pinning check to their grabbing hand prevents it from moving into a strike to my face. Meanwhile, I step with my right foot toward them and strike their ribs.  The technique uses a middle knuckle fist to further concentrate force to the target (which is great if you have developed this weapon over time but otherwise just use your regular fist) -- my viper snake controls their constrictor snake.  This strike isolates their right hand from punching.  From there, I pivot my body clockwise and use my right arm to trap their left grabbing arm to my body while my left inward blocking motion on their left shoulder (or slightly below) levers them backward while my left leg sweeps them to the ground as I transition to a forward bow. From here, a series of stomps are used (if needed) to insure my safe retreat.

Lesson One: Strike the central axis to cancel rotation. Although the first strike is delivered to their ribs, because they are to my flank this blow still energetically cuts through their center and limits their ability to rotate (to punch).    .

Lesson Two: Strike a target that is pre-stretched. The extension of my attacker's left arm "stretches thin" the muscles of the back and abdominal obliques that help protect the ribs. The middle knuckle strike capitalizes on this exposure.

Lesson Three: Moving the body (support) to the arm instead of the arm to the body.  The second movement where we lever against the arm uses the clockwise rotation of our body to bring our support to our right hand trapping their left hand instead of trying to pull our right hand back to our body.  This approach is especially useful when dealing with a substantially stronger opponent.  

METHODS OF DRILL:

1. Practice the technique on both sides and with the attacker in a variety of positions.  Adapt the angle of the initial strike to continue to affect the central axis.  Also practice variations where the attacker's arm is less extended, or pushing you away, or pulling you in, or perhaps causing you to rotate.

2. Have your partner attack with a variety of "extended position" grabs and practice strike reacting with strikes to the most exposed target area.

3. Practice adapting the take down and stomping portions of this technique after blocking your partner's roundhouse and straight punch attacks (right and left sides).

4. Have your partner hold a knife in their free hand and explore what changes you would make and why.

5. Condition your middle knuckle strike by punching gently (both sides) into a bucket of pinto beans.  Make sure your thumb is properly locking the middle knuckle into position.  The volume and power of these punches should be increased gradually over time.  Ideally use Dit Da Jow liniment after each training session.  

WHAT IS IN A NAME? The middle knuckle potentially can break the rib (crack the cage).
1 Comment

09. Plucking the Apple (right rear hammerlock).

3/29/2012

0 Comments

 
My attacker, directly behind me, grabs my right wrist with their right hand and applies a hammerlock hold. If my opponent completes this lock my right shoulder will suffer the brunt of the attack and the position can be used by my attacker to steer me where he pleases. A hammerlock is a simple hold and is easy to counter but timing is critical.

As the hold is applied, I rotate slightly counter-clockwise (to my left) as I counter grab their hold with my right hand.  This provides momentary leverage preventing the lock from being successfully completed.  Obviously, my opponent will quickly change his position to adapt with the intent to continue the application of the lock but this delay will allow my counter hit to be launched:  a left outward elbow targeted to his head (left temple).  If it hits him -- bonus -- but if not it will cause him to evade (lean back) or block me with his free left arm.  All three outcomes have the same important result:  my opponent (whether he is getting hit, evading, or blocking) is not actively applying the hammerlock at this point due to my change of position while providing my counter strike.  The next action is a left eagle talon strike/grab to the attacker's throat.  A palm strike under the chin could be substituted if the situation called for a less violent solution.  This strike (eagle talon or palm) combined with the stance shift to a left forward bow stretches my opponent back and allows me to transition from timing control (hitting the guy before he hits me) to positional control (even as the clock is ticking, my attacker is not in a good position now to offer a solid counter-attack.)  I capitalize on his outstretched position and deliver a right knee to the groin.  As I plant the right foot back to my bow the left returns back (if I maintain the eagle talon to the throat as I return the hand back I am applying the namesake move the techninque "plucking the apple (Adam's apple).  My right hand delivers a palm thrust under the chin clearing my opponent away from me.  

This technique is classified as a crane defense to a snake (grabbing) attack.  Our initial wing (elbow strike) and its unfurling follow up strike as we shift to the forward bow controls the attacker's position.  (NOTE: The target (throat) and weapon choice (eagle talon) does have a viper snake influence.  Very commonly we will use aspects of both the controlling animal and the same animal, intra-animal control, in a technique.)  The knee strike to the groin (one legged stance of the crane) furthers the crane influence but frankly once control was achieved any animal method could have been applied.  

Lesson One: Use a circle to beat a circle.  The hammerlock is two circles.  The larger circle is the one we see that arcs the seized arm up their back toward the left shoulder blade (to lock the right shoulder).  The smaller circle (without which a hammerlock would be an impotent attack anyways) is the small twist of the wrist that creates a secondary lifting action that greatly intensifies the pain in the victims right shoulder.  We negate these two circles with our own two circles that move first "with" and then slightly ahead of our attacker's circles.  The turning of the waist negates their big circle and counter grab negates their smaller circle.  (NOTE:  The counter grab cannot be properly applied without the waist turn.  Just like their attack uses two circles that must work together so does our counter.)

Lesson Two: Axis of movement (sphere of influence).  If our elbow is blocked by their left hand (a likely scenario unless our opponent is oblivious) then the technique changes the axis of our movement from the more linear outward elbow strike to a circular pulling motion that combines my left shoulder and the clockwise hip rotation that is done in transition to the forward bow used for the eagle talon strike.  The structure (angle of support to block) that our opponent needs to stop the original elbow will be by default misaligned to resist the pulling action of our new axis of movement.  Of course, a highly skilled fighter could adapt to this new line of movement and counter -- but an opponent with that level of skill would not attack you with a hammerlock...  If they are that skilled and you are attacked from behind unwittingly then the fight will be over before you knew it began.

Lesson Three: Use a pulley to beat the bully.  Imagine instead of having two separate arms you have one continuous arm.  Your waist becomes the fulcrum point as the one connected arm, like a rope, functions as a pulley.  As I rotate to my forward bow my right arm is pulling them into me (my right hand is holding their right hand because of the counter grab) while my left arm is pushing them away from me with the eagle talon (or palm option).  This pulley action powered by the waist controls their position they are caught in this "coming and going" pairing of opposing forces. 

Lesson Four: Returning motion.  Once a hand goes forward it does not have to come back empty handed.  Holding onto the throat while returning the hand back towards you creates damage in its own right and brings the target area (chin) into my next strike (palm).


METHODS OF DRILL:

1. Practice the technique on both sides and interspersed with other rear attack techniques.  The success of this technique is based on the counter rotation and counter grab happening before your opponent completes the hold and locks/injures your right shoulder.  By not knowing which arm is predictably being grabbed you will not only develop relevant coordination on both sides of your body but will have to make more of an honest reaction to turn the proper way when timing urgency is critical.  Likewise, having a couple of other rear attacks thrown into the mix (i.e. #1 Wings of Entanglement and #6 Revolving Hammer) you can further drill the ability to make the reaction when you are not 100% expecting the attack.

2. Know your enemy.  Practice the hammerlock and work how you may choose to make use of this attack yourself.  Explore different contexts (a guy throws a right punch at me, I parry and move behind him while setting the hammerlock hold.  Explore different ways to negate someone from being able to counter your hammerlock hold by collapsing their stance or using their head as a lever, etc.

3. Circle to beat circle drill:  With your partner and in slow controlled motion, try to keep a continuous flow where one partner begins to apply a lock (wrist lock, arm bar, hammerlock, finger lock, etc.) and the other negates the lock by going with the energy and then altering the circle. Use that circle to create a new lock that now the other partner must negate.  When this back and forth flow ends (because of long hesitation or somebody actually ends up in a lock) then restart fresh.  It is very important to remember this is NOT a competition but an opportunity to work together to explore possibilities.  Slow continuous flow is crucial for this drill to have any real benefit.

4. Multiple opponent variation.  Adapt technique for a circumstance where another impending attacker is in front of you (12 o'clock).  

5. Adapt technique for when you have no space in front of you because you are being forced against a wall while the hammerlock attempt is being applied.

WHAT IS IN A NAME? The returning motion of the eagle talon to the throat is the plucking of the (Adam's) apple.
0 Comments

08. Controlling Wing (right cross wrist grab)

8/30/2011

2 Comments

 
My attacker, directly in front of me, grabs my right wrist with their right hand. A simple attack that could be nullified by punching them in the nose with my left jab... but since the attack is so simple it is an ideal opportunity (as a teaching technique) to explore a range of wrist lock and and arm bar controls. These locks and controls are used later throughout the system. 

Their initial attack is neutralized by delivering a front snap kick to the groin (one legged stance of the crane and unfurling snapping kick of the crane), a counter grab tendon lock using the crane hand, and an arm lock using the crane wing.  The end result is my opponent is now folded and their position controlled.  Crane is the controlling animal (yes, I am aware that a grappling aspect of snake "strategy" has been applied as well) but not only are the tools (elbows and kicks) of the crane animal employed but the entire energetic model of the folding and unfurling aspect of the crane has been used.  Although the overall aspect of constrictor snake is to "grab, choke, and lock" does not imply that the remaining four animals are completely devoid of any grappling aspect.  

Lesson One: The pinning check as we front kick is a subtle and valuable tool.  By slightly dropping my weight while pulling down quickly (but only a couple of inches -- if you pull too far you will be in the way of your front kick and will change a quick jerk into an elongated pull) I temporarily shift their weight forward canceling their height zone so that it is difficult for them to kick me or block my front kick with a leg block of their own.

Lesson Two: The crane hand counter grab tendon lock.  If the attacker's right arm is mostly extended this lock will have no immediate effect but will serve as the bracing point for the upcoming elbow lock.  The technique in the "ideal phase" accepts this point of origin as the premise.  If their arm is significantly bent the tendon lock will drop your opponent rapidly to their knees in pain and the rest of the technique will no longer be necessary.  A knee to the sternum would suffice.  Tip -- for this tendon lock to be succeed your left hand applying the pinning check must maintain adequate pressure to prevent any rotation of their right hand that would reduce the effect of the lock.  This wiggle room allows a significant reduction in pain and thus cannot be allowed.

Lesson Three: The crane wing to lock the elbow joint.  Unlike a conventional arm bar where pressure is placed directly above the elbow joint by the blade of the forearm as it contacts perpendicular to the plane of the arm you are attacking, this crane wing lock (left forearm contact point) diagonally traverses their arm putting pressure below the elbow joint but because of the angle of our pressure (imagine drawing a line through their elbow to the inside of their back left knee) and the winching affect of our pinning check of the left hand and right crane hand pulling slightly up and back into our body, these combined forces produce dramatic control over our opponent's position with a relatively small amount of movement.  Incidentally, this same action is also demonstrated in kata in section four, movement five, of the Tiger-Crane Form.  It is an example of a lock created through the process of the folding into the crane wing.  The process of folding is crucial to understanding this action -- if you do not wedge them into this folding process but simply form an elbow and strike the attacker in the forearm you will have a weak lock that lacks the crane style of energy.

Lesson Four: "More than one way to skin a cat."  Having achieved control over our opponent's position we now have many options before us.  This technique chooses to maintain control by exploring two additional ways of locking the elbow joint (and thus controlling our attacker's position).  The first of these follow up methods is a classic arm bar performed from a twist stance.  (This style of arm bar is described in some detail in the paragraph above and most typically is used by the constrictor snake).  The change of angle taken when using the twist stance is based on moving with the attacker's resisting energy and force fighting against the lock.  If the attacker is not putting pressure against you but is complying to the hold, this action would not be necessary and I would continue my pressure and control on the line of attack I had already established.

The second elbow control used can also be used by the snake but quite often is used by dragon as well -- which is a push down block applied to the joint directly while maintaining counter pressure on the wrist with the arm elongated.

METHODS OF DRILL:

1. Practice the technique on both sides.  One of the principal aims of the technique is to compare and contrast different methods of locking your opponent's elbow and it is important to learn these locks on both sides of our body.  (Again, in "real world" application if a guy grabs my left wrist with his left wrist I will most likely punch him in the nose with my right fist instead!)

2. Drill the technique with more bend in the attacker's arm so the initial tendon lock can be practiced.

3. Pick each of the three elbow locking methods (crane wing, arm bar, push down block) and practice using each of these for every lock applied in the technique to compare and contrast how different stance and position works with each of the methods.

4. Practice eliminating the initial front kick if you are able to apply the counter grab/lock quick enough in the early stages of the technique.  If you fail in the counter grab/lcok, than apply the front kick as an after thought for when resistance is met and continue onward with the technique from there.

5. Explore using this technique to seize and control an opponent who has blocked your strike.  For example, you are both in a right lead and your right back knuckle to the head is blocked.  You stick (do not retract back) to their block and immediately apply the controlling wing technique.

6. Explore using this technique from the ground.  You are on your back with an opponent mounted on you and trying to punch you in the face.  From your right outward parry to their right cross you apply this lock and further add to the winching affect by rolling with the lock to your right side.  Play with even parrying with a left inward parry and applying this lock without the assistance of your right hand.  A critical skill if that right hand is not available.

WHAT IS IN A NAME? The crane's wing (particularly the affect of folding into the wing) lock's my opponent's elbow and controls their position.


2 Comments

07. Disabling the Bear (front bear hug -- arms free)

8/21/2011

4 Comments

 
I am grabbed from the from the front, hugged, with both of my arms pinned against me.  The grab is the strategy of the snake, and I will respond with viper snake by delivering two ridge hands to the groin.  (My next follow up move will be crane as I use a left crane hand to brace them for my right knee to their groin.)

Lesson 1: Marriage of gravity to increase leverage of movement.  By dropping your weight first then stepping back with your right foot to your left forward bow you will have much greater leverage in affecting their center of gravity and creating space away from your opponent on the opening move.  If you do not drop your weight and your opponent is holding low on your arms you will likely find that your your right leg went back but your center went nowhere!  

Lesson 2: Weapon proximity.  With both of your arms pinned, frankly your striking options are limited anyways.  However, the ridge hands are already conveniently located near a vital target so no point in making things difficult -- take the easy shot.

Lesson 3: Bracing opponent for the blow.  Our left crane hand pulling down on their right shoulder allows us keep their weight over their feet so we dealing with their knees or kicks and it fixes their weight into a position to force the target to full absorb our strike.  It is not how much power you generate that matters but how much of that energy is actually absorbed into a target.  The bracing insures that retreating is at a minimum so that energy absorption is at a maximum.

Lesson 4: Covering out by clearing your opponent.  The right reverse thrust punch at the end to the sternum is to clear our opponent away from us.  This is assuming we do not feel it necessary to deliver more damage before clearing.  Striking the sternum is an excellent target for moving an opponent backwards.  Hitting below this target area (solar plexus or stomach) would cause more folding of the opponent than actual clearing.  Wait for this sternum punch to be thrown with the actual shift to the forward bow.  DO NOT allow your punch to impact before you have planted from your knee into your forward bow.  (It can start slightly before you plant but should not impact until you have that foot on the ground and are actively driving into that forward bow.) 

METHODS OF DRILL: 

1. You need to have the biggest person in your class squeeze you in a solid bear hug and compare dropping the weight and then stepping back with trying to just step back to the forward bow. 

2. Play with varying the timing of your reaction to when the hold is first being set, almost fully set, and is fully set.  Note -- dropping the weight first is not needed if they are in the early stages of setting the hold.  In this case your expedience in creating distance will serve you better than the lowering of the center of gravity.  Also play with skipping the step back and ridge hand altogether if you intercept earlier in the hold.  The step back and ridge hand is to create distance once in the bear hug but if the hold is not fully applied that right knee will offer significant deterrence! 

3.  Have your partner stand at bear hug range while holding a kicking shield so you can apply the technique with full force.

4. In a "worse case scenario" that the hold is so substantial you cannot even apply the opening move try pinching the inner thigh to create some space. (Still a viper snake strategy.)

WHAT IS IN A NAME? The bear hug (our opponent) is countered (disabled) by our actions.

4 Comments

06. Revolving Hammer (left rear grab on right shoulder)

8/17/2011

1 Comment

 
I am being pulled backwards by my attacker's left grab on my right shoulder.  The attack is a grab and thus the snake strategy.  The counter is crane (lots of folding and unfurling of the "wing") but definitely a vital snake influence as well as we target the groin and bridge of the noise repetitively.

Lesson 1: We are moving back because we had no choice.  If I felt a grab on my shoulder I would not choose to step blindly into the unknown and walk into a punch, or worse, a knife in my back or kidney.  This technique is teaching how to make the best of bad timing situation.

Lesson 2: Ideally I maintain my center of gravity and balance as I move back.  If throughout your everyday casual movement and lifestyle, you commit to maintaining posture and an active awareness of your center, then even when surprised you will maintain good balance.  Your position will change, of course, but posture and sense of center will not be lost.  However, if you wait to have posture and balance once you are actually in a fight, you will be off balance because you were unaware of your center before their energy impacted you.

Lesson 3: Borrowed force.  Use the force of the initial pulling to transfer that body momentum into your initial strike -- the hammerfist to the groin.

Lesson 4: Limit target exposure by having your strikes travel along a path that clears your most vulnerable target area.  Self-defense is an active process and trying to block every attack that comes at us without offering retaliation would be a naive approach.  Without deterrent, our attacker will likely continue the assault until eventually their strike finds the mark.  Of course, when you strike your hand (or leg) is no longer in a defensive position.  This vulnerability can be partially offset by having the strike travel in a path that is occupying the zone that your opponent would have to travel to hit you.  On revolving hammer, our initial hammerfist is protecting our right kidney and ribs which is a target that is being accelerated towards our opponent's fist or knife.  Note that our head is protected by our left hand that is doing the pinning check on their left hand which is holding our shoulder.  So while the left hand does a pinning check against one attack, it is also serving as a positional check against other attacks to that zone.

Lesson 5: Repeating a combination to insure the job is done.  Like an airplane with redundant features (when one engine fails you do not fall out the sky), repeating a series of strikes will amplify the damage if all the blows strike but will also allow accuracy adjustments if your initial strikes are blocked, are too far away, or simply slightly miss the target.  A hammerfist to the thigh is annoying but does not create the affect we want when striking the groin.  The vertical backfist to the bridge of the nose will obstruct their vision (eyes naturally tear up) and cause immediate bleeding and distracting pain.  That same strike if it missed and hit the forehead will hurt our fist as much (or more!) than their forehead.  So sometimes it is good to practice repeating a strike, or combination of strikes, to insure the result desired is achieved.

METHODS OF DRILLL:

1. Practice the premise of maintaining center of balance when pulled by drilling with a partner where you close your eyes and they push and pull on you a variety of directions and amount of force.  Try not to anticipate where to step but just concentrate on feeling a sense of posture, relaxed rootedness, and awareness of your center.  As the force travels into you move as needed (but not more) to keep balance. This is fun to do with one student with their eyes closed as two or three classmates just push and pull them around.

2. This entire technique (except the rear scoop kick) is perfect for practicing on a hanging heavy bag.  This will allow you to work full power. A kicking shield also will work for this drill.

3. This technique is easily adapted for a variety of attacks from both the front and rear.  Also this technique can be grafted to just about any of your existing techniques. 

4. Play with "alternative endings."  This techniques uses a scoop and rear kick and then covers away from opponent.  However, if when unlocking your car door you got grabbed, you would not have room to cover out in that fashion.  Explore alternative exit strategies.

WHAT IS IN A NAME?  The repetitive swinging from the hammerfist to the groin and vertical back knuckle to the bridge of the nose is "revolving" (at least a partial revolution).


1 Comment

05. Wings of Devastation (front two hand choke)

8/14/2011

1 Comment

 
Attacked by a front two hand choke (snake strategy) we employ the crane to clear the hold and then provide a barrage of counterstrikes with a brutally effective combination of elbow strikes with of course a kick to the groin early on for good measure.

Lesson 1. DO NOT fight directly against the power of the choke (directional vectors of their force).  It might be tempting to grab the opponent's arms and pull outward (laterally) to become free of the choke.  Don't -- it won't work unless they are a small child or in the final stages of cancer treatment.  Their force is already squeezing inward on your neck and an outward pull is fighting in direct opposition to this energy.  Also the nature of grabbing in this manner will result in your elbows being out and above their elbows which puts your opponent in a position of superior leverage. 

Lesson 2. Leverage against the weak part of the grip -- the thumbs.  With our hands clasped (never interlock your fingers) we raise our arms up which applies force in an upward path against their hold and allows our elbows to be leveraged and the force to transfer to their thumbs which is the weak link in their grip.

Lesson 3. Simultaneous defense and counter attack.  The kick to groin is applied with the clearing motion.  Although in this case the kick is not needed to help the clear succeed, it will help position the body weight of attacker back forward to offset the lifting energy of our clear.  This is needed to help check our opponent from purposeful or accidental access to their own legs to kick.  

Lesson 4: Marriage of Gravity.  The trapping motion on the opponent's arms is fueled by the dropping of our body weight as we plant forward and down from the kick to the groin.  This pins both of their arms momentarily and aids in dramatically shifting the body weight forward adding to the cancelation of the height zone.

Lesson 5. Sequential Opportunity and Target Prepositioning: Having brought our opponent forward and down and due to our proximity, the next series of elbow strikes are each (in sequence) not only causing injury in their own right but are controlling the timing so that the next action in the technique sequence can be launched.  Like a pool shark clearing the table, we do not give an opponent the opportunity to deliver a strike.  Furthermore, the target we are hitting has been prepositioned to maximize vulnerability.  

METHODS OF DRILL:

1. Try using brute force to laterally pull a front two hand choke off of you.  Now compare with just a subtle lift motion using only the thumbs for force.

2. The clearing motion is a natural swing arc with the hands clasped.  Students like to separate the hands outward (which is still fighting against the inward pressure of the hold and is a bad idea). Also students like to reach straight upward with hands instead of arcing upwards. This does not apply the lifting force properly. Use sticks or wooden swords and have students drill the arc used to raise and lower a sword properly.  The clear is exactly the same.

3. The combination of elbow strikes are useful anytime you are at close proximity to attacker.  Drill a variety of attacks and explore how to use this combination.  Also experiment with using these elbow combinations in a ground fighting scenario.

4.  Drill each of the elbow strikes on a focus target to improve accuracy and power transfer.

5.  The technique ends with an outward elbow that unfurls into an outward back knuckle.  The back knuckle becomes a "chaser" strike as opponent is being cleared out of range.  Put the technique in "movie reverse" mode and start at a further range using the back knuckle first then shuffling into your elbow (Do not even bother with a choke -- you are closing in on the attack.) 

6. The initial clear works primarily because it is not fighting directly against the direction of the opponent's force.  In additional to a lifting energy, experiment with other directions of applying energy to our opponent's hold that could also work because they are not in opposition to the inward pressure. Remember that in every snake their is a tiger element you can take advantage of with dragon.  (Snake is associated with the element of earth.  Metal is created by earth and metal is tiger.  So just like metal is buried inside the earth the Tiger energy is buried inside the snake.  So if you are skilled enough, you can nullify the snake by using dragon to defeat the undercurrent of tiger that beneath the surface.  In this case, as they squeeze in on my neck I can actually add to the inward pressure to free myself from the hold. Proceed with caution and control until you get the concept mastered however.

WHAT IS IN A NAME?  The "Wings" of the crane (elbows) are used in rapid combination to "devastate" your opponent. 

1 Comment

04. Flanking Talon (wrist grab from flank).

8/8/2011

0 Comments

 
Our opponent (to our right flank) has grabbed our right wrist with his left hand.  The attack (grab) is classified as a snake and our defense will be the crane as we make use of the one legged stance and deliver our kicks. Like many of the beginning level techniques, the initial grab is not that great of a threat so the larger issue is how to take control of the timing and distance of the situation to nullify other likely attacks.

Lesson 1. Destabilize their base.  If you cut down a tree at it's trunk, the rest of the tributary branches will also be laying on the ground.  By stomping their left instep and striking their left knee you should cause sufficient destruction to their stance that the platform of launching their other weapons will be significantly hampered.  Much like bombing a runway so the planes won't take off to begin with, reduce your opponent's firepower significantly by attacking the very stance that supports their ability to punch and kick.  (Please note that while kicking our free hand is on guard in a positional check just in case a strike is already on the way.)

Lesson 2. The reach (and lack of) of a kick.  Range is the most miscalculated factor of combat. Stomping an attacker on the instep requires close proximity.  Likely, when your wrist is grabbed you are too far away to achieve this objective and will have to adjust to be closer to your opponent -- a "drag-step" maneuver will usually do the job.  A kick has maximum reach when it is in direct line with the fulcrum point (hip) and as the arc goes beyond that point (higher or lower) the reach diminishes,  Thus, the same type of kick to an opponent's instep will require you to be much closer than to his ribs.  This is also why we can apply stomps and low kicks quickly and easilty to an opponent while also striking with our hands because these are all close range tactics.

Lesson 3. Do not rely on your opponent for balance.  A common error in applying a stomp is to lean your body weight onto your stomping leg.  This is dangerous because you striking a target that you are also leaning on for your balance.  Just because the kick is very low does not allow you to place weight anywhere but on your support leg.  

METHODS OF DRILL:

1. Drill the technique for both sides and with variations of your opponent's position (not always purely from the flank but also more behind you or more in front of you).  Make sure also that the range of your opponent is also varied so you can adjust footwork to the different circumstances.

2. Practice the stomp on a bag.  Lay a kicking shield or heavy bag on the floor and practice sliding up into your side stomp (both sides) to their instep.  This not only improves your confidence in transferring power to the target but reinforces your footwork and understanding of distance to help the kick succeed.

3. Vary footwork options.  The drag-step is the most common way of applying the opening stomp move in this technique.  This creates a timing of sliding your support foot towards your kicking leg (and towards your opponent) and then kicking.  Another option is to use the pull-drag maneuver which is less telegraphic because you initiate the kick first and allow it to pull your support leg towards your opponent in the process of delivering the stomp.  Sometimes if more range needs to be covered than usual you can combine the two and drag-step and then also pull drag once the kick has been initiated. Another option is to use a very small lateral jump where the stomp is timed with your landing.  This method is very fast, very strong, but more committed with less recovery options. 

4. Diversify for a variety of grabs.  There are very few cases when grabbed you couldn't stomp a guy somewhere!  Play and experiment with one partner or an entire free for all "brawl" in class is always fun.

5. Graft into your other techniques.  As an intro, in the middle of a technique, or at the end of another technique, add either the instep stomp or knee kick or both.

6. Rearrangement of order.  Kicking the knee first then stomping the instep also has merit and should be drilled.

WHAT IS IN A NAME?  Our opponent's grab is similar to the talon of a bird snatching its prey.  The attack comes from the flank. Thus, "Flanking Talon."
0 Comments

03. Clearing Kimono (L. lapel grab).

8/5/2011

1 Comment

 
Our opponent grabs our shirt/jacket with their left hand.  By itself, this is not much of a threat but is typically a "distance gauging" and positional guarantee for their right punch or perhaps knee strike.  Thus our goal is not simply to clear their hand from the grab but more significantly reduce their options of succeeding with an actual strike.  This technique works well preemptively (as they reaching to grab us) or reactively (after the grab has been accomplished).  It does not work well after they have already succeeding in punching us in the face while holding us! 

Controlling Animal Strategy: Their grab (snake strategy) is cleared through our crane (wing folding and re-extending is our clear and then immediate strike.  Our target choice (hand sword to throat) has a viper snake influence as well.  Because you can counter an animal strategy with either the controlling animal or its own animal (crane beats snake but also viper snake can counter constrictor snake) it is quite common to see an influence from both the controlling animal and the same animal within a single technique.  

Lesson 1: Affectng all three zones of movement: Height, width, and depth.  We clear their grab with our right arm moving in an inside downward diagonal path as if drawing a line from their left ear to our back leg (left toe).  By moving diagonally we transverse height, width, and depth zones.  The downward aspect affects height (causing them to bend over slightly which places weight over their feet reducing immediate access to kicking.)  The inward component of our clear affects their width which turns their body and limited their ability to launch with power a right punch. Because the clearing path travels towards us it draws their body in to us which affects their depth by accelerating their next target (throat) towards us and limits their ability to retreat out of range.

Lesson 2: Frictional pull.  There are three ways of increasing the amount of pulling on our opponent that our clearing hand causes (frictional pull).  First, making the initial contact on the higher part of our forearm (closer to our elbow) on the higher part of their forearm allows a longer duration of contact while traveling the inside downward diagonal path.  If we contact them at the right place on their arm but with the bottom of our forearm then we lack leverage at the beginning of the action because we are jammed up (operating within the a rim of your natural leverage is preferred).  If we contact them at the bottom of their forearm we at best will clear them but certainly will not draw them in much.  Having the correct leverage and a longer duration of contact is what we are seeking.  Second, we want our forearm to rotate (clockwise) from a palm partially facing down position to a palm up position by the completion of the clear.  This rotation will increase the contact (friction) and provide rotational directional vectors to reel our opponent into us (and down).  The third component is a principle of its own right, marriage of gravity, which is power generated and transferred into our movement by properly timing the benefit of dropping our center of gravity. The added "weight" to our arm through this principle also adds to the frictional pull.   

Lesson 3: Rebounding.  After clearing their arm we conserve our momentum by rebounding (bouncing off our abs) to reverse direction quickly as we deliver the right outward handsword to their throat.  This rebounding makes the movement faster (no stopping, restarting), more powerful (we arrive at the target with greater actual velocity and force = mass x velocity squared), and energetically more efficient (we used left muscular effort because we did not have to contract muscles to stop the arm and then reengage those muscles to reaccelerate the arm.)

Lesson 4: Borrowed Force.  If our clear is done properly so that their body is falling towards us; and if our handsword  is applied correctly so that by rebounding it arrives soon enough to the throat to take advantage of their motion that is still coming towards us; then we benefit from borrowed force which simply means that the impact is greater because of kinetic energy of their target that is running into our weapon.  Like two cars at 30 mph each having a head on collision that is now the equivalent of a 60 mph crash we allow our handsword and their throat to have a heads on collision.  

NOTE:  The above is a good example of "the whole being greater than the sum of the parts."  The magic in quality martial arts is often when several seemingly small details are done correctly which collectively work together to bring out a dramatic result.  All too often (in all martial arts) a method is discounted because somebody is missing or is misapplying a key small ingredient that links and binds all the preceding principles and thus negates much of the end result.  They then dismiss the movement.  Although any technique of any style can always be "improved upon", you can probably assume that if simply does not seem to work at all for you it is because there is a big piece of the puzzle you are missing.

METHODS OF DRILL:

1.  This technique should be practiced preemptively and reactively and like all techniques on both the right side and the left side.

2. Diversify the attacks while still applying this same sequence.  A two hand lapel grab, a straight punch, an outward back knuckle, a two hand or single hand push are just some of the attacks that this technique (especially in the preemptive clearing method) work well against with no modification.

3.  Isolating the force variables.  Practice just the clearing aspect each time adding a different component to the frictional pull equation.  First, just clear with no step back or body weight drop and no rotation. Add in just step and feel the difference.  Take away the step and add in just the rotation of the hand and feel the difference. Put the rotation and step together and feel the accumulative benefit.

4.  Play with the idea of frictional pull on all  your blocks and see how it can be used to alter your opponent's body position.  For example, a R. inward block against a R. roundhouse punch with a little counterclockwise torque at the end of the block will pull their width component a little more so that their left hand becomes momentarily isolated.

5. Grafting:  This entire technique is only two moves (and about 1000 words to describe it!) and thus is easily joined with other techniques.  Use other techniques for follow up after the handsword to the throat; use clearing kimono as a follow up to other techniques you know.  Anytime they have a hand up that would be good to check or clear, clearing kimono a quick and easy way to integrate that feature.


6. Experiment with the good, bad, and ugly of frictional pull and affecting your zones of your opponent.  For example, clear your opponent's left lapel grab with your left hand doing an inside downward diagonal clear and you will notice that you turned his width towards you thus accelerating his free right punch into your face!  So know the implication of sending an object into motion that you do not become the receiving end of an "accidental move" that you cause. A classic example would be clearing somebody down and then getting head butted in the nose.  Congratulations, they are not holding your lapel but now you have a broken nose and are knocked out cold.

7. Practice hitting bags (focus mits and twin kicking targets ideal) with that R. outward handsword.  Ideally the handsword should also be conditioned over time by striking a canvas bag with beans inside.  Each strike in a technique is only as viable as you have prepared and trained it to be.


WHAT IS IN A NAME?
"Kimono" is the Japanese term for a jacket.  Thus clearing kimono is to clear the hand off of your jacket.  Additionally, clearing implies the universal sweeping of the height, width, and depth zones which is a crucial lesson introduced in this technique.
1 Comment

02. Slicing the Peach (front headlock).

8/1/2011

1 Comment

 
This technique can be used as the front headlock is set or as your opponent is in the process of applying the hold.  The attacking animal strategy is snake (all grabs/holds/chokes are) and we are using the viper aspect of snake (fangs) in the form of a ridgehand to neutralize this attack.

Lesson 1:  Weapon proximity.  Our ridgehand is close to their groin so that makes it an excellent "first responder" to deal with the threat.  The closer a weapon already happens to be to a target then the faster it arrives and the less likely it is to be blocked or avoided.  "Good now"  wins over "better later."

Lesson 2. Sometimes instead of addressing a hold directly at first, we are better off simply to cause pain.  At a minimum, it will help distract their focus from applying the hold (and our counter measures to escape the hold) and it is possible that the blow will be disabling enough to where no other action is required.  

Lesson 3.  The left pinning check to their R. knee at the beginning of the technique is an important initial check and also helps prepare the leg for being locked later (our transfer of weight into our left pushdown block on the knee encourages the leg to lock which checks both the their leg we are contacting from striking us both with the that weight on the knee it also helps cancel out the other leg from kicking or kneeing because they would fall down if they attempted.)  Often a slight adjustment back with our left foot will set the distance more naturally for our right foot to advance forward into our close kneel.

Lesson 4.  The follow up after the ridgehand teaches a take down through applying a lock against their right knee.  This uses the concept of opposing forces which is used wether you are locking a knee joint, an elbow, etc.  We put pressure against the joint to lock it while stabilizing or counter pressing against the end of the lever that the joint is attached to.  In this case, our left hand cupping behind their heel while our right forearm puts pressure right above the knee to lock it.  

PLEASE NOTE:  They do not fall down because we lift their foot off the mat but rather they put themselves down in an attempt to avoid the pain in their knee from the lock.  The pain motivates the movement.  It takes far less effort to lock a knee then to lift up somebody with one hand while kneeling on the ground!  As they fall to avoid the pain, our left hand which was bracing and perhaps pulling behind their heel does lift their leg up -- exposing the groin for a stomp and just as importantly checking the leg against launching an attack as they fall.

Methods of Drill.

1. Although the left pushdown block as a check on their right knee happens immediately, new students often are slow to coordinate this action while also trying to execute the ridgehand.  I highly recommend drilling the opening attack (right ridgehand to the groin) until that portion is second nature before adding the additional check.  Likewise, make sure these two moves together are natural and can be applied with confidence before adding the leg locking takedown and stomp.  THE INITIAL MOVEMENT IN ANY TECHNIQUE IS THE MOST CRITICAL! 

2. The knee lock is an equally valid movement for stand up fighting. Drill blocking and trapping an opponent's mid level or high kick and then applying the knee lock.  Work on both right and left sides.

3. Take the concept of weapon proximity and drill with your partners  a variety of attacks while we sample different points of origins (starting positions) trying to pick logical stikes that allow you to hit a close target with a weapon that is conveniently available nearby.

4.  Learn how to properly apply a front headlock so that your body weight  is leveraging the hold and that the pressure is applied (controlled) to the wind pipe and the one side of the carotid artery. My left hand should help winch the hold in and not simply be hanging out.  The better you understand the attack the better you can train to neutralize it.  

5. Use a focus mitt or twin kicking target (those tear shaped bags) to train the ridgehand strike to the groin.  Make sure you keep a bend in your right arm when hitting.

What's in a name?  Our ridgehand (ridge meaning the backside of a sword) is used to slice our opponent's groin (testicles with a little imagination could be compared to peaches...)
1 Comment

01. Wings of Entanglement. Full Nelson Attack.

7/30/2011

1 Comment

 
We have been placed completely in a full nelson and folded forward like a pretzel.  If he arches us backwards instead then time for "Plan B" because this technique would be exactly the wrong response.

Lesson 1:  Don't let a guy fold you forward like a pretzel.  Once you are familiar with what a full nelson feels like in its approach, far better to react by pulling your elbows in close to your body and he will not be able to set the hold.  Meanwhile a few head butts and heel clips to the groin should offer deterrence.

If you do get folded forward, you are screwed so this technique teaches that if you are going down don't fight it but at least go to the ground on your terms as much as possible.  We accentuate the circle of the fold and with our right arm pinning (I hug that my right arm tight to my own body trapping his right arm) we roll and become the inside of the circle while our opponent becomes our crash pad.  Everything after that is just to mop things up and go home safely.

Thus the principle of nonresistance is applied, demonstrated, and drilled in this technique.  To go with their momentum, to not fight against their energy but to add to their directional momentum and thus take ownership over their energy by adding to it!  It would be like somebody gave you a check for $250 that would not clear because their account was $5 short.  Deposit $6 in their account and now that $250 is yours.  Better to have walked away with $244 than a just a bad check.

Controlling Animal Theory:  The full nelson is a snake attack (all grabs are)  the defense is a crane action (folding our arm into the crane wing for the initial counter throw and the elbow, hammerfist, elbow action once on the ground is more of our wing folding, unfurling, and refolding.

Methods of Drill:  
1. Definitely practice different ways to stop your opponent before having to resort to being folded and flipping down to the ground with him.  
2. Practice a stand up version where you use a spin instead of a flip to redirect their folding energy and thus drive them into a wall, a nearby opponent, the bank atm machine, etc.
3. Lay a bag (kicking shield, heavy bag, few extra layers of mats) on the ground and practice generating striking power and follow through from this prone position.  Leveraging is a little different when horizontal and not vertical!
4. Take the principle of non-resistance and freestyle drill being pushed, pulled, etc. and how you can move their energy and by adding to their momentum and vary the directional vectors of their force slightly you can take control over their position.
5. The "elbow, hammerfist, obscure elbow" combo can be applied in a variety of different contexts in both stand up and ground points of reference.  Drill a variety of attacks and see when you might be able to make practical use of this combination.

Safety note:  If the attacker (dummy) is considerably smaller than the one applying the technique than the attacker (dummy) will get crushed!  Don't do it.  Besides, how often do little guys try to put huge guys in a full nelson? 

What's in a name?  Their arms are folded in our arms which are like wings that are entangled.  Just like two birds whose wings get all tangled up we too end up spiraling down to the ground (but with them on the bottom as our crash pad.)

1 Comment
<<Previous

    Author

    Trevor Haines is the founder of Five Animal Kenpo and is a 6th Degree Black Belt in American Kenpo.  He has been a student of Kenpo since 1977 and an instructor in Kenpo since 1986. He currently owns Dojo Chattanooga in Chattanooga, Tn.

    Picture
    Sketch of Sijo Trevor Haines by Leslie Harrelson

    Archives

    February 2014
    February 2013
    April 2012
    March 2012
    August 2011
    July 2011

    Categories

    All
    Beginning Stage
    Techniques

    RSS Feed

Powered by Create your own unique website with customizable templates.